qPerfusion = Dual Sequence + Fermi/BTEX deconv + MoCo + Gd Map + MBF/MPR
心筋灌流の **絶対値定量化 (Quantitative Perfusion)** を実現する WIP/C2P sequence の徹底解説。Dual Sequence (LV cavity AIF + myocardium signal を同時取得) → Gd Concentration Map 変換 → Fermi or BTEX deconvolution で MBF (Myocardial Blood Flow) / MPR (Myocardial Perfusion Reserve) 算出。KCL Amedeo Chiribiri + NIH Peter Kellman 双璧の論文徹底解説 + 三重大/東北大 routine。Common Limitation は Common Limit page 参照。
TL;DR
- Dual Sequence = LV cavity (AIF) + myocardium 同時取得。AIF saturation 回避が key、絶対値定量化の前提
- 2 deconvolution model: Fermi function (簡易、empirical) vs BTEX (Blood Tissue EXchange, mechanistic, Chiribiri 推進)
- 双璧 KOL: KCL Chiribiri (BTEX, multi-center clinical) + NIH Peter Kellman (PSIR, MOCO, fully-automated workflow)
01qPerfusion 全体技術 cascade — 5 段 + 双璧の研究者
Dual Sequence → Gd Map → MoCo → Deconvolution → MBF/MPR の 5 段技術。
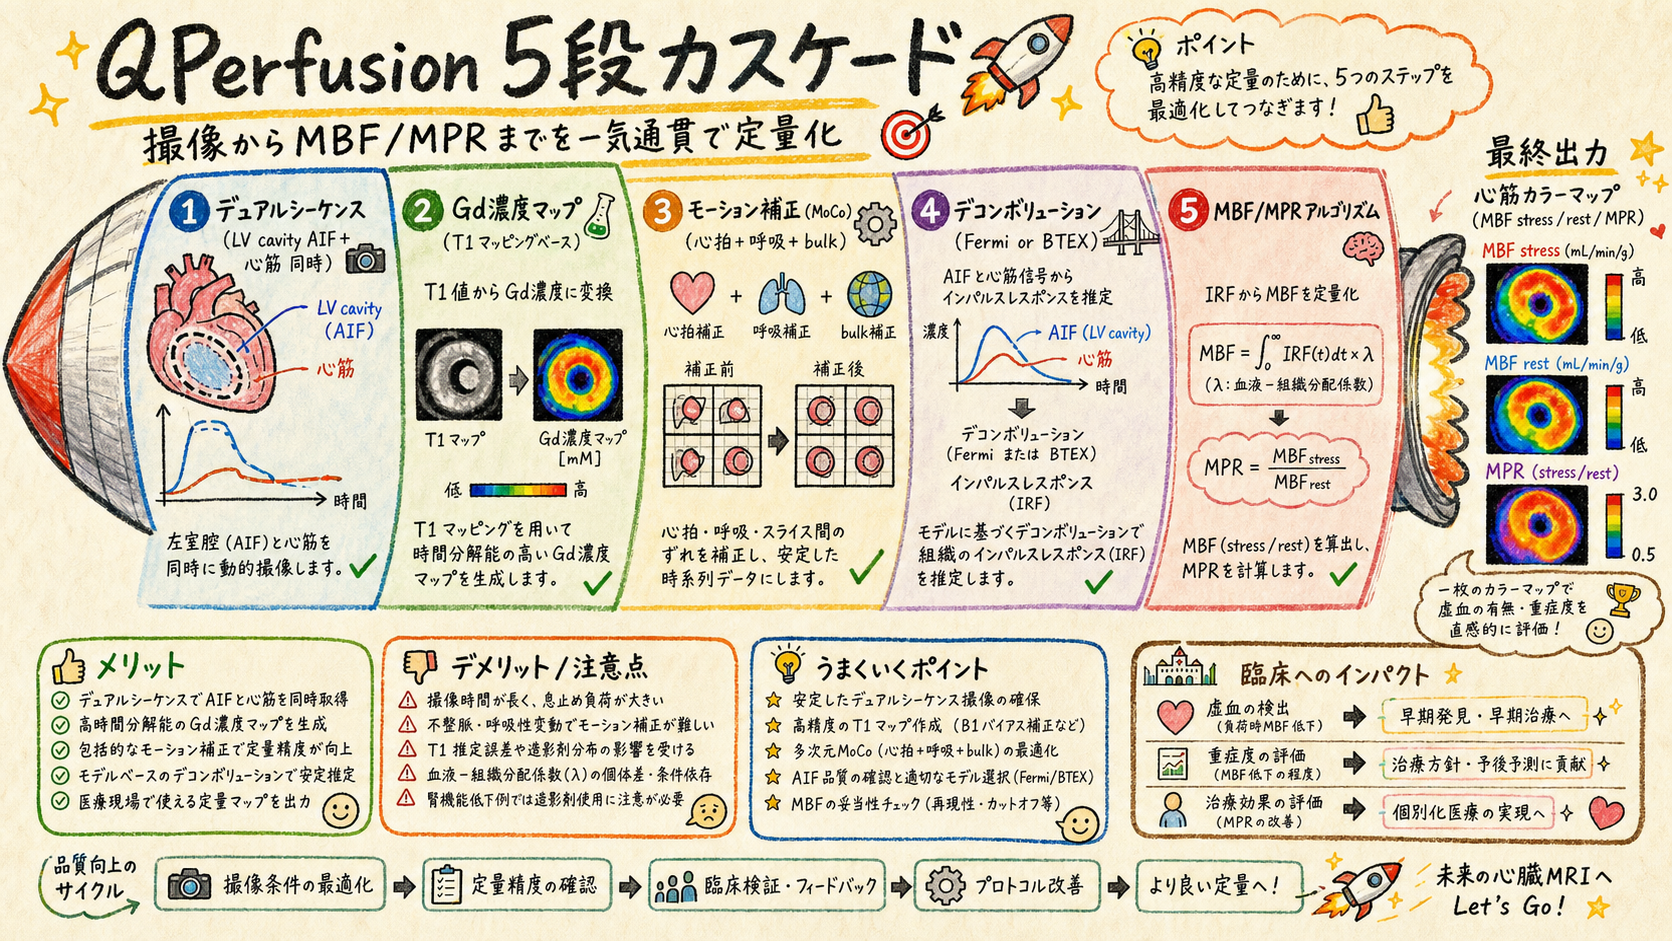
qPerfusion (Quantitative Myocardial Perfusion) は心筋灌流を 絶対値 (mL/g/min) で定量化する WIP/C2P。従来の semi-quantitative (signal intensity ratio) と異なり、multi-center 比較可能 + cut-off 適用可。Common Limitation (WIP=研究用 / Single-vendor / IPA) は Common Limit page に集約。
| # | Component | 役割 | section |
|---|---|---|---|
| 1 | Dual Sequence | LV cavity AIF + myocardium 同時取得 | 本 page §02 |
| 2 | Gd Concentration Map | signal → Gd 濃度変換 (T1 mapping based) | 本 page §03 |
| 3 | MoCo (Motion Correction) | 心拍 + 呼吸 + bulk motion 補正 | 本 page §04 |
| 4 | Deconvolution (Fermi or BTEX) | AIF + tissue signal → impulse response → MBF | 本 page §05-06 |
| 5 | MBF / MPR algorithm | Stress + Rest = MBF、ratio = MPR | 本 page §07 |
| 6 | 臨床例 + Decision Tree | 三重大 + 東北大 + NCVC routine | 本 page §08 |
📚 用語解説 — qPerfusion: Quantitative Myocardial Perfusion。心筋灌流を mL/g/min 絶対値で測定。stress (アデノシン負荷) + rest (安静) で 2 回撮像、MPR = stress / rest。
📚 用語解説 — semi-quantitative vs quantitative: semi = signal intensity ratio (施設 / 装置依存)、quantitative = mL/g/min (multi-center 比較可)。
📚 用語解説 — 関連 ZK note: [[BTEX_Model]] [[Fermi Deconvolution]] [[Kellman PSIR-MOCO]] [[Myocardial Perfusion Reserve]] [[NCVC_qPerfusion]] [[Compare_StressPerfusion_Vendors]] [[4_Perfusion]] 等 6+ files (10_Knowledge/20_Wiki/10_Concepts/)。
🛠️ 運用方法: (1) 医師に「qPerfusion = 5 段 cascade、各 component が定量化精度に影響」と説明 (2) 失敗事例 (MBF が異常値) を component 単位で trouble shoot (3) Chiribiri (KCL) + Kellman (NIH) 双璧を理解、論文選択時に lineage 区別
⚠️ Common Limitation 必読: WIP/C2P = 研究用 (NOT 医療機器) / VA60A 推奨 / IPA 締結必須 / Single-vendor → 詳細 Common Limit page。
02Dual Sequence — LV cavity AIF + myocardium 同時取得
AIF saturation 回避が絶対値定量化の前提、2 種 sequence を交互取得。
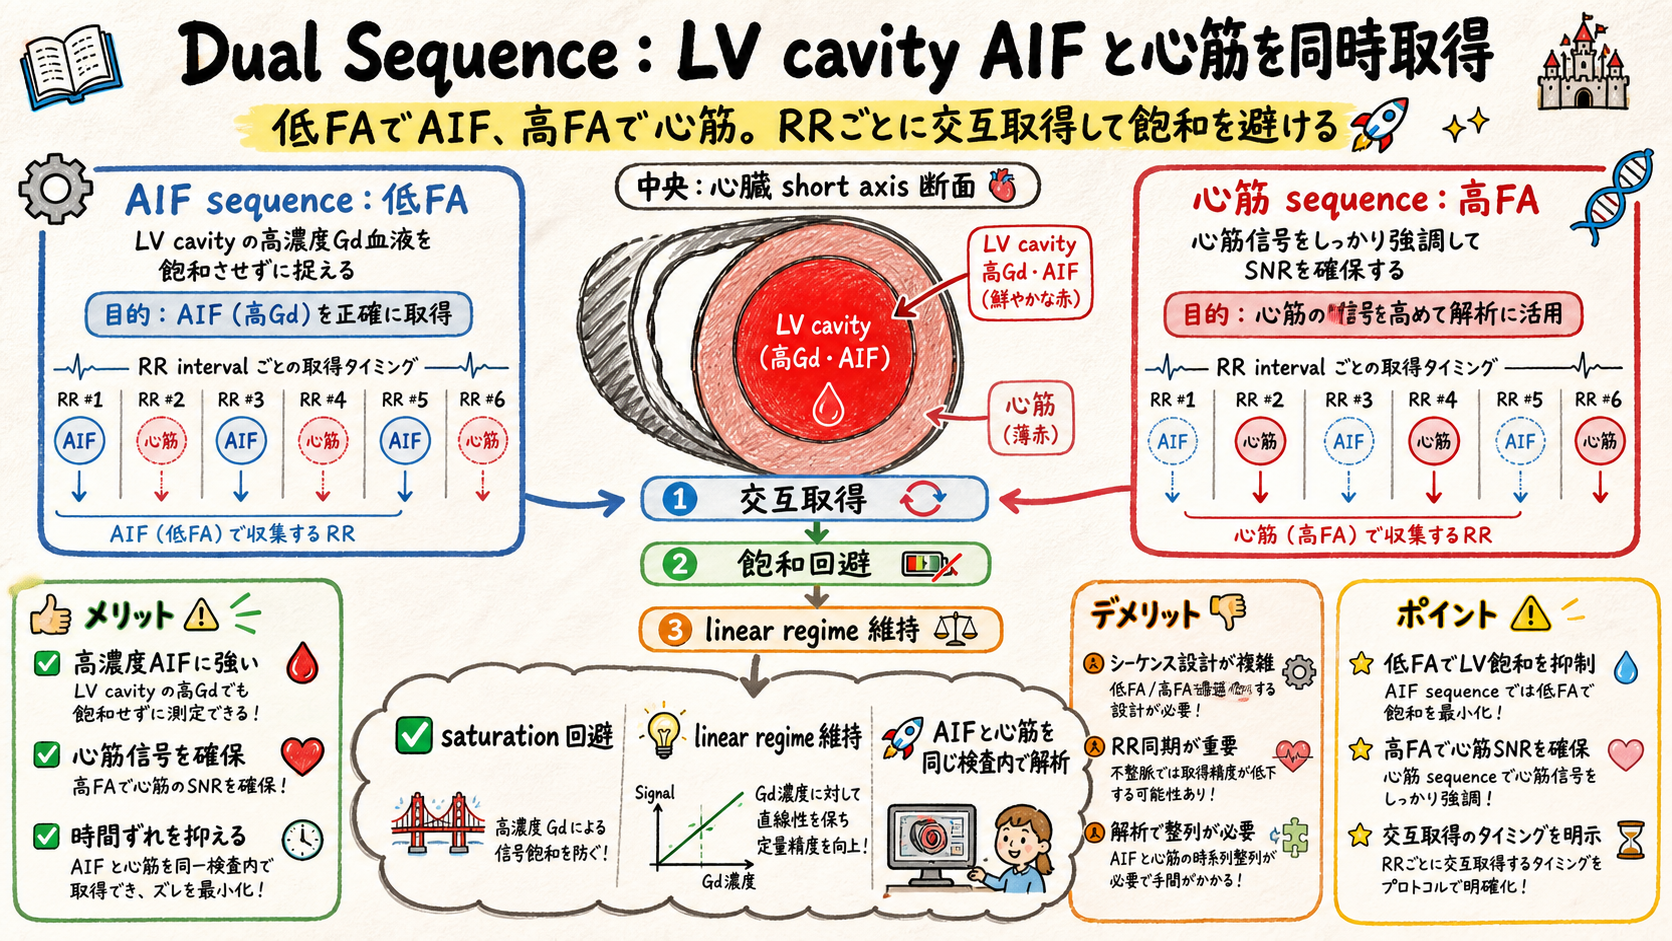
| 要素 | AIF sequence | Myocardium sequence |
|---|---|---|
| 対象 | LV cavity (Gd 濃度高) | Myocardium (Gd 濃度低) |
| FA (Flip Angle) | 低 FA (~10°) | 高 FA (~50°) |
| TR / TE | 短い | 長め |
| Saturation 回避 | 低 FA で linear regime | — |
| 撮像 timing | 各 RR interval で交互 | 同上 |
📚 用語解説 — AIF (Arterial Input Function): 心筋灌流の入力関数、LV cavity 内の Gd 濃度時間曲線。Deconvolution の input、絶対値定量化に必須。
📚 用語解説 — Saturation 問題: LV cavity の Gd 濃度高 (~5 mM peak) で signal が saturation → AIF 過小評価 → MBF 過大評価。低 FA で linear regime に保つ。
📚 用語解説 — Linear regime: signal ∝ Gd concentration の領域。低 FA + short TR で確保、qPerfusion の前提。
📚 用語解説 — Dual sequence の代替: 単一 sequence で AIF + myocardium 両方取得する手法もあるが、saturation 回避が困難 → multi-center 標準は dual。
🛠️ 運用方法: (1) Stress + Rest 各々で dual sequence 取得 (4 撮像/case) (2) AIF curve の peak が saturation してないか確認 (>3 mM で警告) (3) Myocardium signal の SNR 確保のため high FA + 平均化 (4) 撮像 timing を ECG trigger で精密制御
⚠️ アンチパターン: 単一 sequence で AIF + myocardium → saturation で MBF 不正確。AIF curve を目視で peak 確認なし → saturation 見落とし。Stress + Rest の sequence parameter 異なる → MPR (ratio) 計算崩壊。
03Gd Concentration Map — Signal → Gd 濃度変換 (T1 mapping based)
Pre-contrast T1 + post-contrast signal で Gd 濃度を pixel ごと算出。
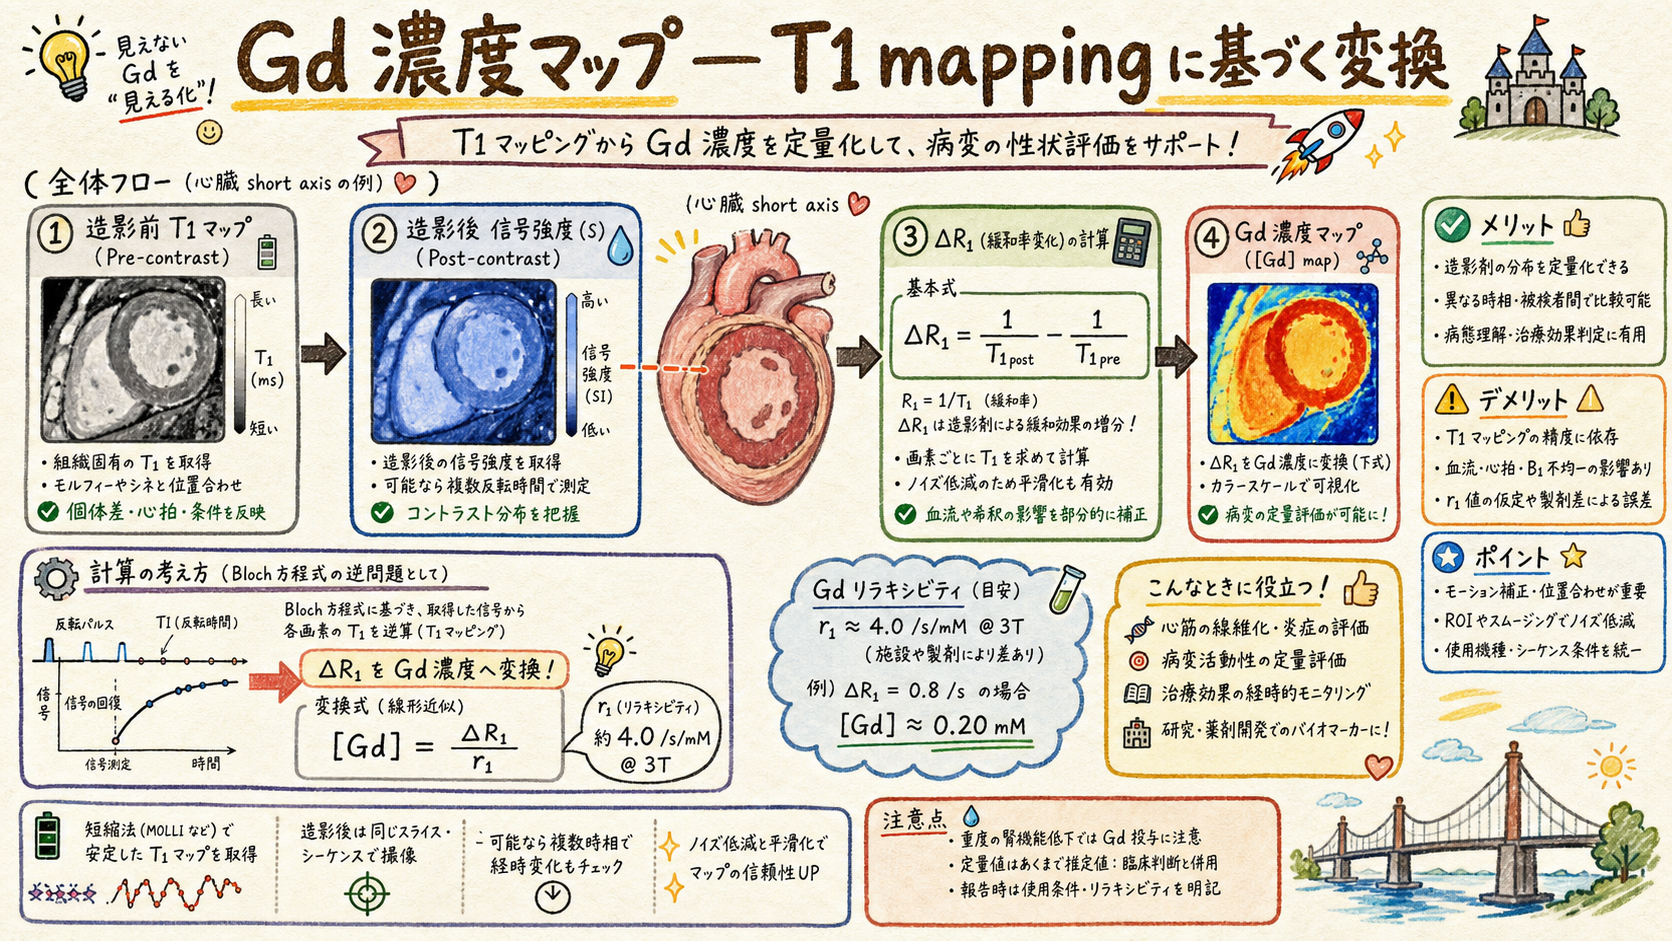
- Step 1: Pre-contrast に T1 map 取得 (MOLLI / SASHA / SAPPHIRE 等)
- Step 2: 動的灌流撮像で signal 時間曲線取得
- Step 3: Bloch equation 逆計算: signal + T1 + sequence parameters → R1 = 1/T1
- Step 4: ΔR1 = (R1_post - R1_pre) / r1 (Gd relaxivity, ~4 /s/mM @ 3T)
- Step 5: Gd concentration map = ΔR1 (時間 × 空間 4D matrix)
📚 用語解説 — T1 mapping: 各 pixel の T1 value を測定する技術。MOLLI (Modified Look-Locker IR) 標準、cardiac syncing 必須。
📚 用語解説 — Gd relaxivity (r1): Gd 1 mM が R1 を増加させる係数、~4 /s/mM @ 3T (Gadovist), 文献値で施設標準化。
📚 用語解説 — Bloch equation 逆計算: 通常 signal = f(T1, FA, TR) を解いて T1 算出。固定 sequence parameter で signal → R1 の look-up table 構築可。
📚 用語解説 — Pre-contrast T1 map の重要性: 患者個人 T1 で baseline 設定、施設間 / 患者間比較可能性向上。
🛠️ 運用方法: (1) Pre-contrast T1 map を必ず撮像 (MOLLI 5(3)3 等) (2) Gd relaxivity は施設で固定値採用 (Gadovist = 4.4, Magnescope = 5.2 @ 3T 等、文献値) (3) Gd map 計算は recon software で自動化、operator 介入最小 (4) Stress + Rest で別々に Gd map 計算 → MBF 算出
⚠️ アンチパターン: Pre-contrast T1 map skip → 仮定値で誤差大。Gd relaxivity を施設で変更 → 過去症例との比較不能。Signal を直接 deconv → Gd map 経由なしで semi-quantitative に逆戻り。
04MoCo for Perfusion — 心拍 + 呼吸 + bulk motion
Stress 時の頻拍 + アデノシン副作用 (深呼吸/咳) で motion 多発、MoCo 必須。
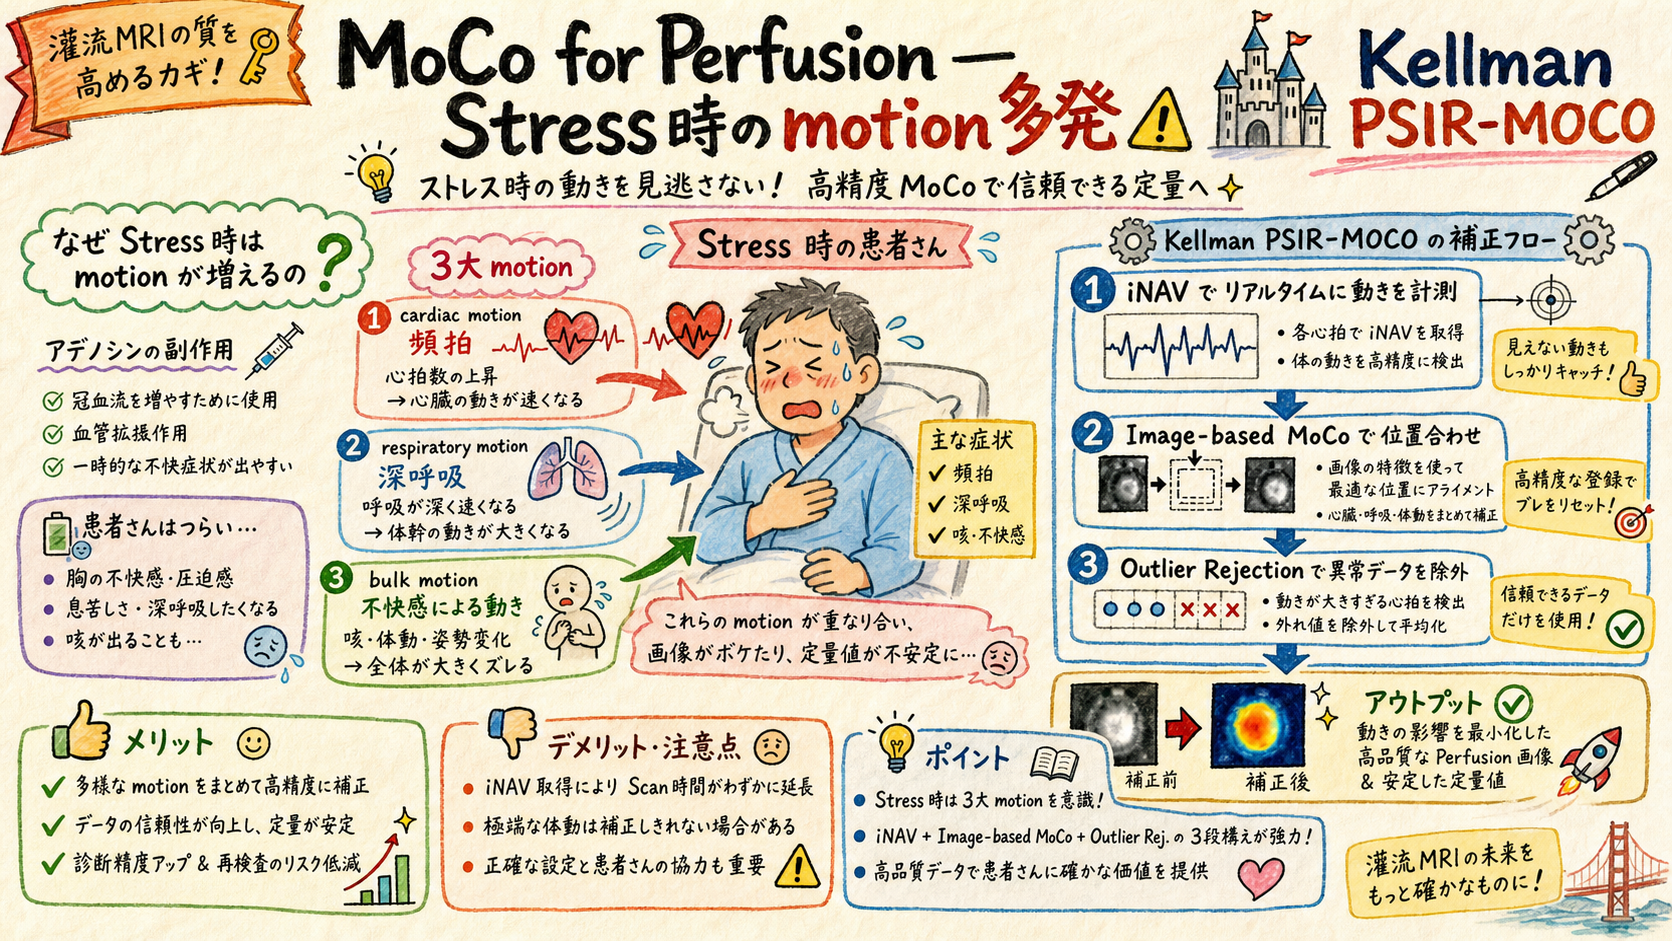
| Motion 種類 | Stress 時の特徴 | 補正方法 |
|---|---|---|
| Cardiac (心拍) | 頻拍 (HR ~100-130) | ECG gating + bin |
| Respiratory (呼吸) | 深呼吸 (副作用) | iNAV + soft-gating |
| Bulk (体動) | 咳 / 不快 | k-space rejection |
| AIF curve drift | Slow drift | Polynomial detrending |
📚 用語解説 — アデノシン負荷: 冠動脈拡張薬、心筋灌流を最大化。副作用 = 頻拍 / 胸部不快感 / 深呼吸 / 咳 → motion 多発。
📚 用語解説 — Kellman PSIR-MOCO: Peter Kellman (NIH) が Cardiac MR の standard MoCo として確立、PSIR + image-based MoCo の組合せ。qPerfusion にも応用。
📚 用語解説 — Outlier rejection: 動きすぎた frame を recon から除外。AIF curve は連続性保つため interpolation。
🛠️ 運用方法: (1) Stress 撮像前に患者に「副作用ある」事前説明 (2) MoCo 失敗時 (image quality 低下) は AIF curve smoothness 確認 (3) Outlier ratio (>20%) は撮像 quality 警告、再撮像検討 (4) Kellman の MoCo paper を施設に共有
⚠️ アンチパターン: アデノシン副作用を skip 説明 → 患者驚愕で motion 増。MoCo を skip → MBF の variance 大幅増、定量化精度低下。Outlier rejection なし → 動いた frame で MBF 異常値。
05Fermi Deconvolution — 簡易 empirical model
Fermi function fitting、計算高速、Cardiac Suite 等で実装。
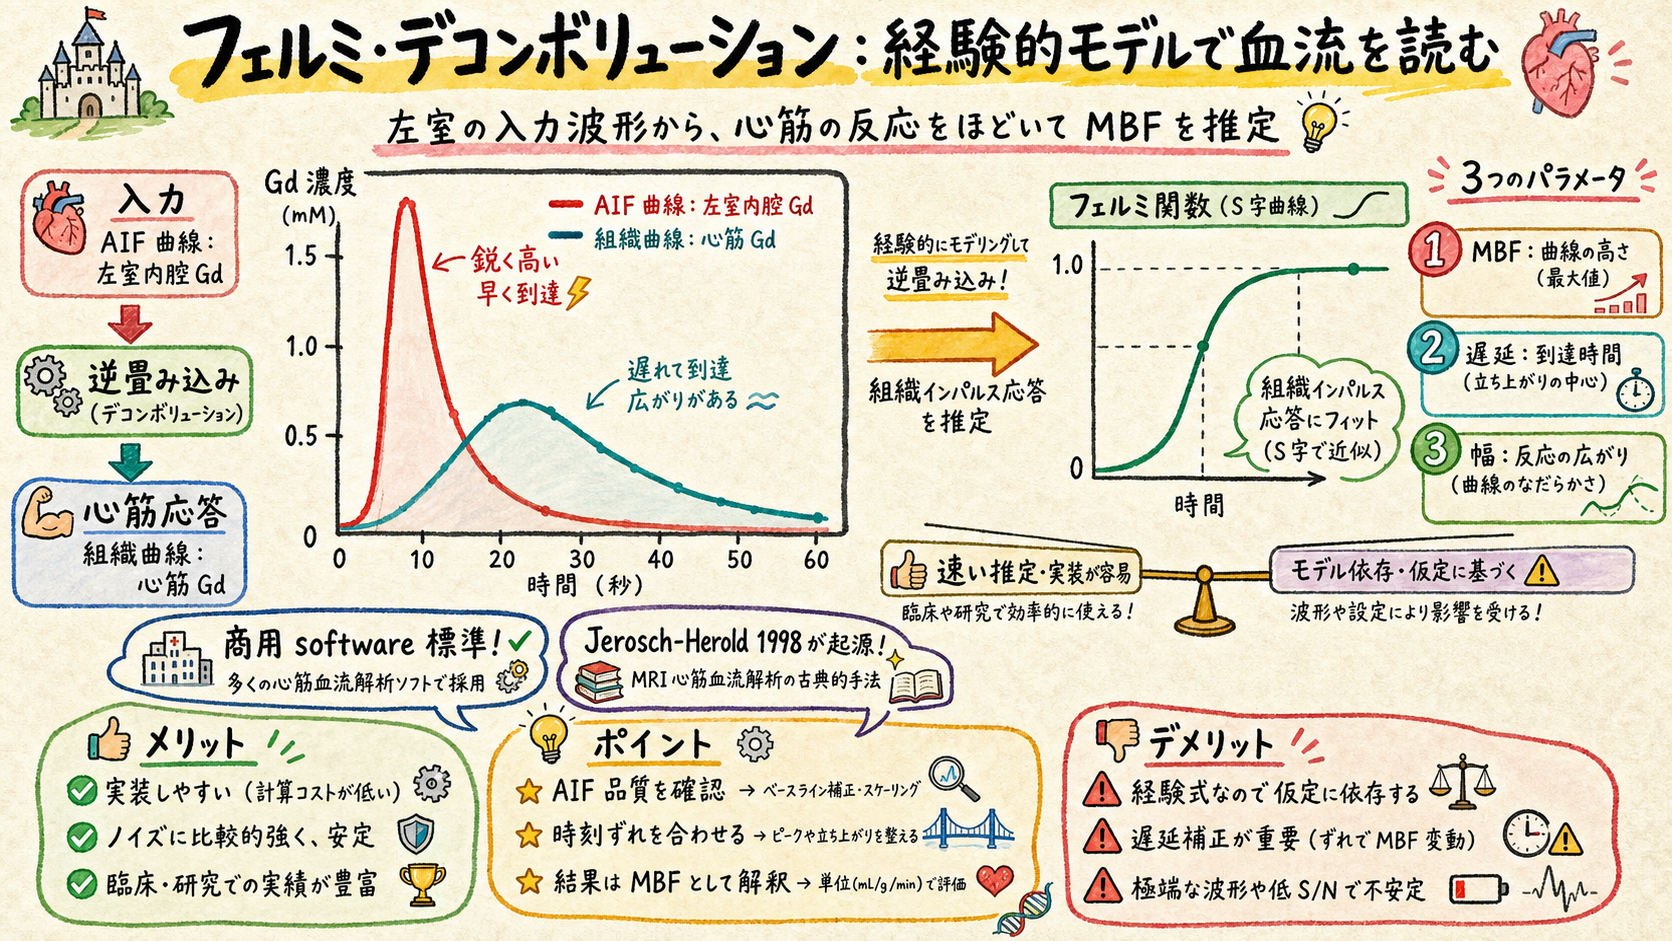
Fermi function deconvolution: Tissue impulse response R(t) を Fermi function で近似、AIF と convolve して tissue curve を fit。**簡易 + 計算高速**、商用 software (CMR Tools, Circle CVI42) で標準実装。
- Step 1: AIF (LV cavity Gd curve) + Tissue (myocardium Gd curve) を抽出
- Step 2: Tissue(t) = AIF(t) ⊗ R(t) + 残差 (ノイズ)
- Step 3: R(t) = Fermi function = MBF / [exp((t - t_d)/τ) + 1] (3 parameter fit)
- Step 4: Fitting で MBF (mL/g/min) + delay + width 算出
- Step 5: Stress / Rest = MPR (Myocardial Perfusion Reserve)
📚 用語解説 — Fermi function: 物理学の Fermi-Dirac 分布関数の形 (1 / [exp((x-μ)/T) + 1])。Tissue impulse response の近似として 1980s から使用、Jerosch-Herold 1998 (MRM) で広く採用。
📚 用語解説 — Empirical vs mechanistic: Fermi = empirical (実測 fit、機構不問)、BTEX = mechanistic (生理学 model)。
📚 用語解説 — 商用実装: CMR Tools / Circle CVI42 / cvi42 で標準実装、routine 使用可。
🛠️ 運用方法: (1) Fermi は計算高速、初期評価に最適 (2) 三重大 / 東北大 で routine 使用 (3) 商用 software で operator 介入少 (4) BTEX との比較で Fermi の限界を理解
⚠️ アンチパターン: Fermi の物理意義を過剰説明 → empirical なので深追いしない。BTEX と混同 → mechanistic vs empirical の区別必要。
06BTEX Deconvolution — Mechanistic 2-compartment model (Chiribiri 推進)
Blood-Tissue Exchange、生理学的 model、KCL Chiribiri グループ世界リード。
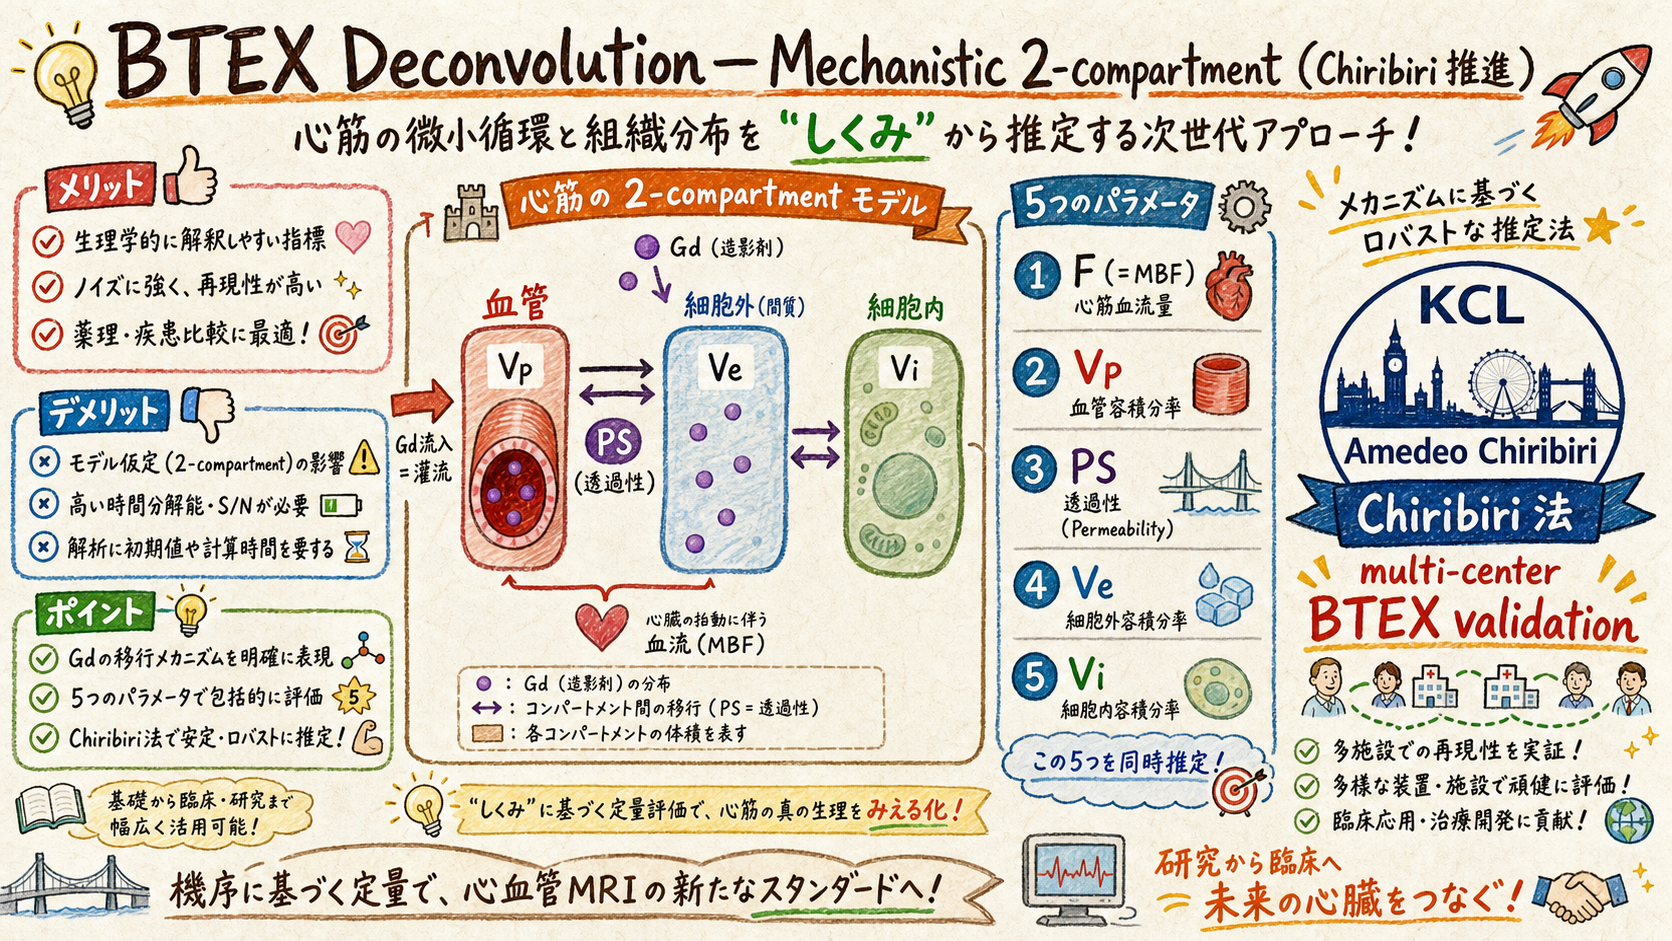
BTEX (Blood-Tissue Exchange) は心筋を 血管 + 細胞外 + 細胞内 の compartment に分け、Gd の compartment 間移行を記述する mechanistic model。KCL Amedeo Chiribiri グループが multi-center clinical validation を推進、世界 standard 化。
| Parameter | 意味 | MBF との関係 |
|---|---|---|
| F (= MBF) | Myocardial Blood Flow (mL/g/min) | 主 output |
| Vp | Plasma volume fraction | 微小血管 |
| PS | Permeability-Surface area product | 膜透過性 |
| Ve | Extracellular volume fraction | ECV と関連 |
| Vi | Intracellular volume fraction | 細胞内 |
📚 用語解説 — BTEX (Blood-Tissue Exchange): Bassingthwaighte 1989 の 2-compartment model、心筋灌流の mechanistic model。Fermi より生理学的に正確。
📚 用語解説 — Amedeo Chiribiri: KCL (King's College London) cardiac MR、qPerfusion + BTEX の世界 leader。Multi-center BTEX validation 主推進、ACDC 等 dataset 公開。
📚 用語解説 — BTEX vs Fermi の違い: BTEX = 5 parameters (F + Vp + PS + Ve + Vi)、 fitting 重い + 数値安定性 issue あり。Fermi = 3 parameters、軽い。BTEX が「正しい」が、Fermi が routine 実用。
📚 用語解説 — Manabe との関係: 三重大 / 東北大 qPerfusion で BTEX 比較研究中、Chiribiri との connection 育成中。
🛠️ 運用方法: (1) BTEX は research grade、商用実装少 (2) Chiribiri グループの open dataset (ACDC) で validation (3) 三重大 + 東北大 qPerfusion で BTEX vs Fermi 比較研究 (4) ISMRM/SCMR で Chiribiri と直接交流推奨 (5) 関連 ZK [[BTEX_Model]]
⚠️ アンチパターン: BTEX を「Fermi より良い」と曖昧 push → 商用実装少、運用負担大。BTEX 5 parameters を全て fit しようとする → 数値不安定、PS と Vi は固定推奨。Chiribiri 引用なしで BTEX 説明 → 信頼性低下。
07MBF / MPR Algorithm + Peter Kellman (NIH) Fully-Automated Workflow
Stress + Rest = MBF、ratio = MPR、Kellman の fully-automated workflow が世界基準。
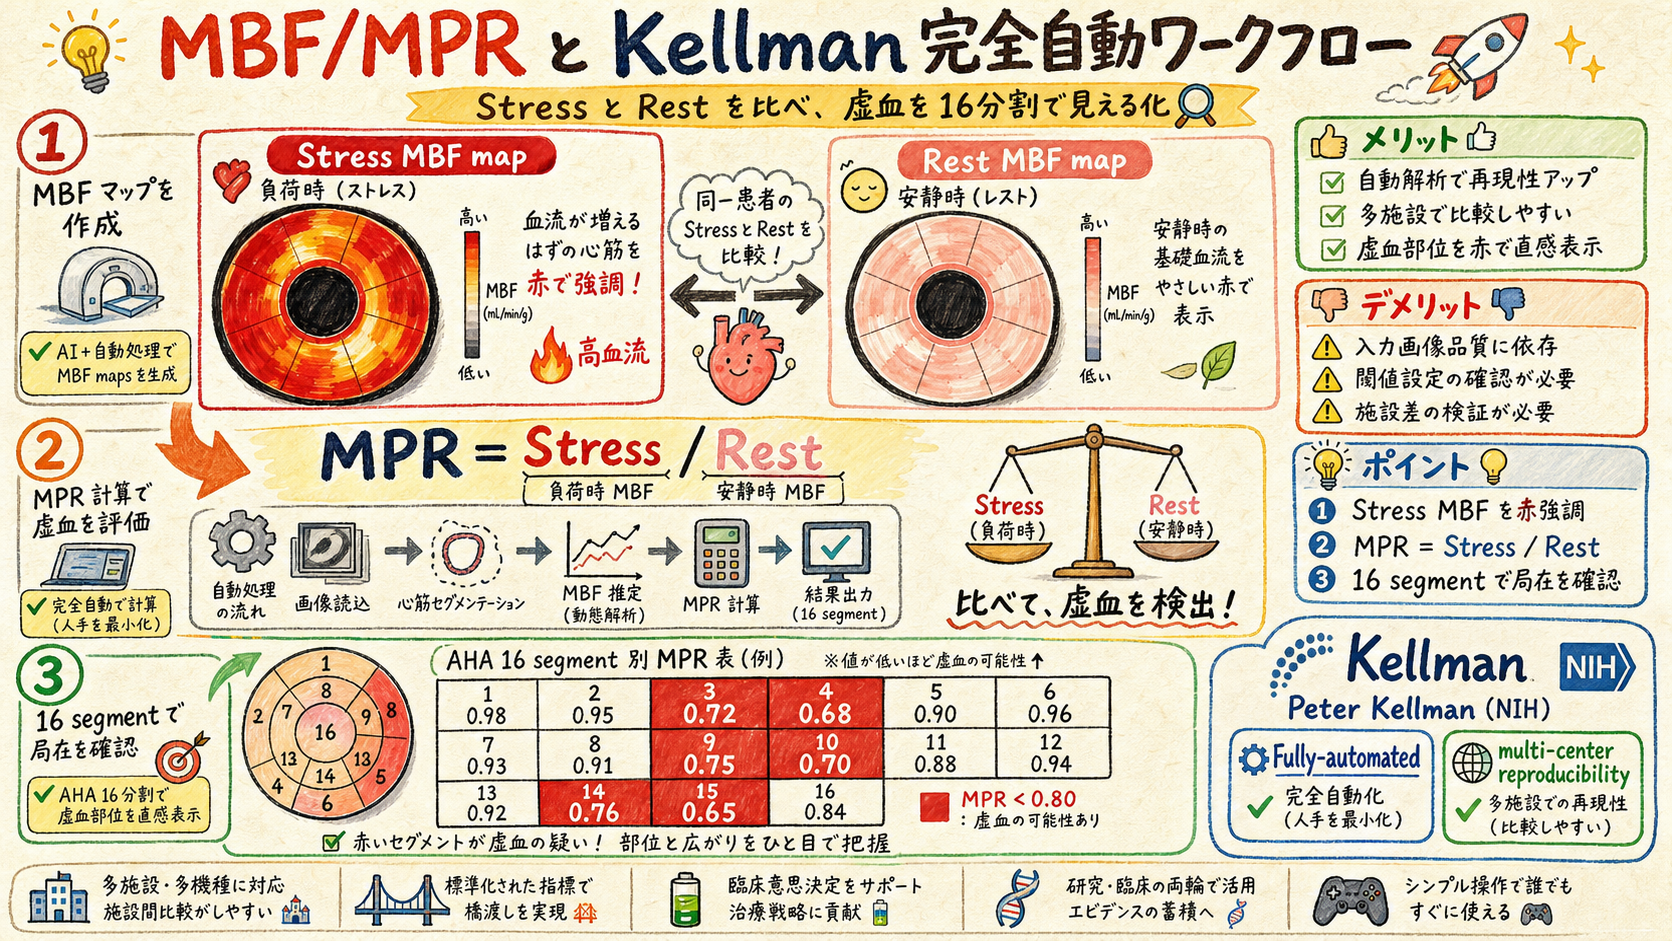
| 指標 | 計算 | 正常値 | 異常閾値 |
|---|---|---|---|
| MBF rest | Rest deconvolution 結果 | 0.6-1.0 mL/g/min | — |
| MBF stress | Stress deconvolution 結果 | 2.0-4.0 mL/g/min | <2.0 で疑い |
| MPR (Myocardial Perfusion Reserve) | MBF stress / MBF rest | 2.0+ 正常 | <1.5 = 異常 (虚血) |
| Segmental MBF | AHA 16 segment 別 | — | Segment 異常 = local 虚血 |
📚 用語解説 — MBF (Myocardial Blood Flow): 心筋単位重量あたり灌流量 (mL/g/min)。Stress (アデノシン負荷時) + Rest (安静時) の 2 値。
📚 用語解説 — MPR (Myocardial Perfusion Reserve): MBF stress / MBF rest。冠動脈疾患の機能的指標、CFR (Coronary Flow Reserve) と類似概念。
📚 用語解説 — Peter Kellman: NIH (NHLBI) cardiac MR、元 Siemens collaborator。Fully-automated qPerfusion workflow 確立 (Kellman 2017 JCMR + 2019 Circulation)、operator 介入最小化 + multi-center 標準化。
📚 用語解説 — AHA 16 segment: American Heart Association 心筋 16 区分。Segmental MBF で local 虚血を検出。
📚 用語解説 — Manabe との関係: 三重大 (qPerfusion 2502 active) + 東北大 (active) で Kellman workflow 採用、Chiribiri BTEX と比較中。
🛠️ 運用方法: (1) Kellman fully-automated workflow を施設に紹介、operator burden 最小化 (2) MPR cut-off (>2.0 正常 / <1.5 異常) で診断 (3) AHA 16 segment 報告で local 虚血検出 (4) Chiribiri (KCL) + Kellman (NIH) 双璧の論文を施設に共有 (5) 関連 ZK [[Kellman PSIR-MOCO]] [[Myocardial Perfusion Reserve]]
⚠️ アンチパターン: MBF 単独で診断 → Stress / Rest 両方必須、MPR が key。Operator manual selection 多用 → Kellman 自動化の reproducibility 損失。AHA 16 segment skip → local 虚血見落とし。
08臨床例 + 訪問前 30 秒 Decision Tree + 双璧の論文 5
三重大 + 東北大 + NCVC routine、訪問対応 30 秒判断、KCL/NIH 双璧論文。
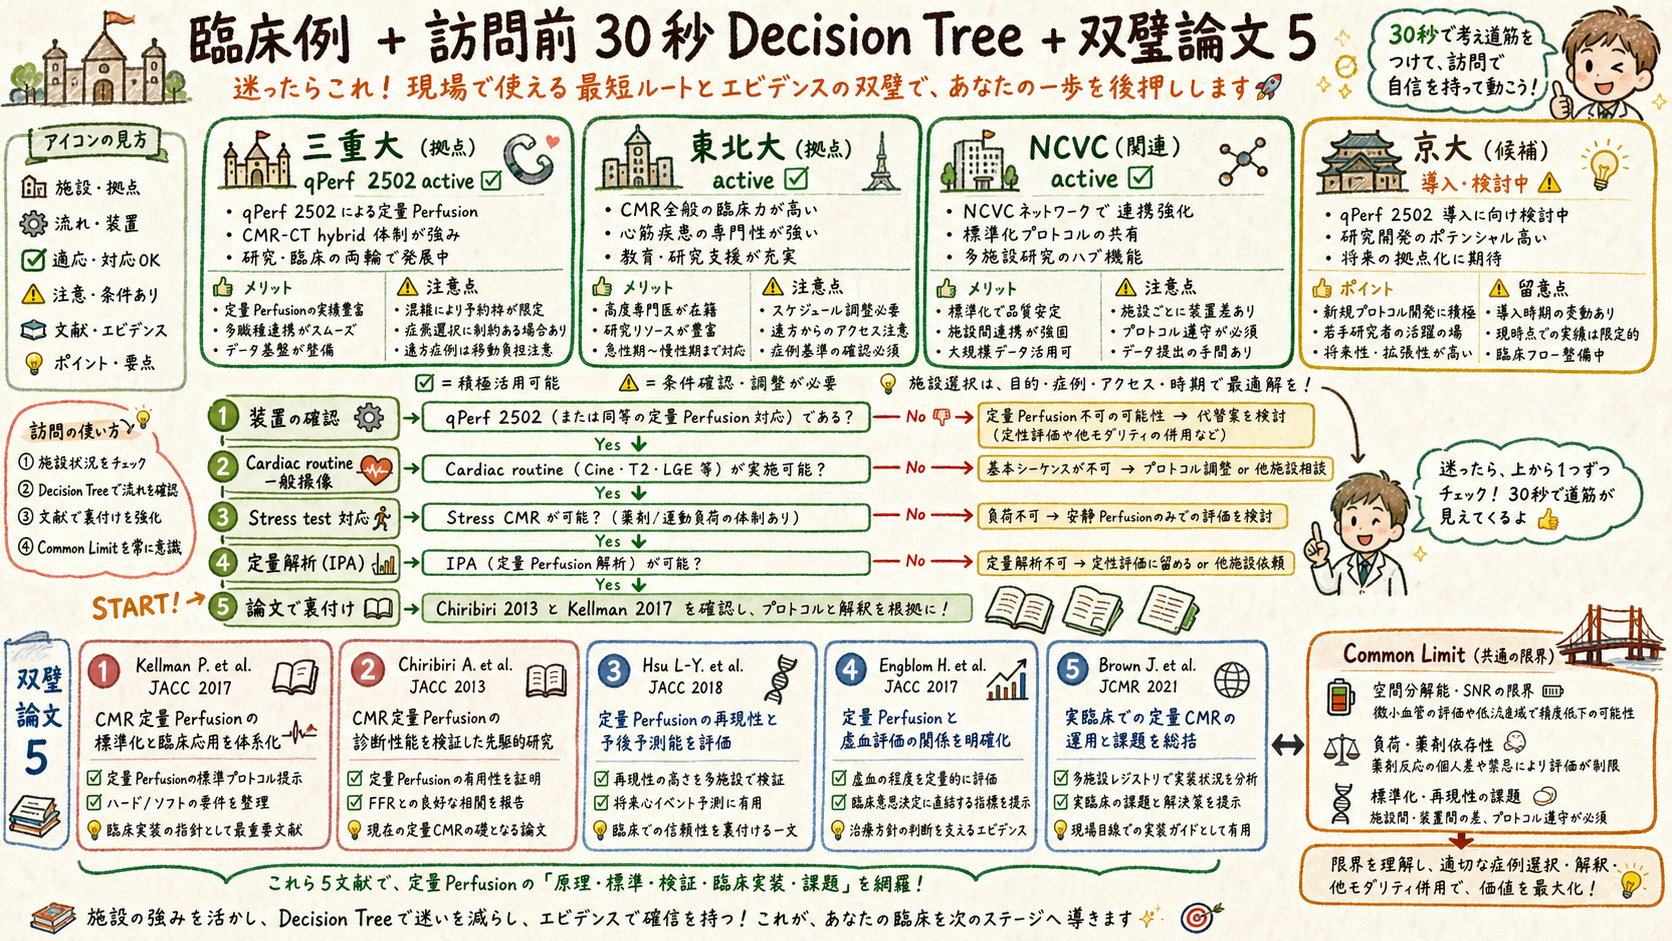
| 施設 | qPerfusion status | 代表 use case | WIP/C2P code |
|---|---|---|---|
| 三重大学 | 2502_Quantitative_Perfusion active | Stress + Rest MBF + MPR | WIP/C2P |
| 東北大学 | qPerfusion active (継続) | Multi-vessel disease 評価 | WIP/C2P |
| NCVC | qPerfusion 関連研究 active | Cardiomyopathy + 灌流 | WIP/C2P |
| 京都大学 | Neuro 中心、Cardiac qPerf 候補 | 未契約 | — |
| 他施設 | Cardiac MRI routine 化次第 | — | — |
| # | Author + Year | Journal | 貢献 |
|---|---|---|---|
| 1 | Kellman 2017 | JCMR | Fully-automated qPerfusion workflow |
| 2 | Chiribiri 2013 | JCMR (or Circ Imag) | BTEX vs Fermi multicenter validation |
| 3 | Hsu 2018 | JACC Cardiovasc Imaging | qPerfusion clinical outcome |
| 4 | Engblom 2017 | JCMR | Fully-quantitative AIF correction |
| 5 | Brown 2021 (latest) | Circulation | Multi-center qPerfusion + AI |
🛠️ 運用方法 — 訪問前 30 秒 Decision Tree: (1) MAGNETOM Vida/Skyra/Prisma + VA60A+ ? → No → 終了 (2) Cardiac MRI routine ある? → Yes → (3) Stress test (アデノシン) 施設対応? → Yes → qPerfusion 提案 (4) IPA タイムライン提示 (5) Chiribiri + Kellman 論文添付 (6) Fermi (商用) vs BTEX (research) を選択肢提示
⚠️ Common Limitation 必読 (再掲): WIP/C2P = NOT 医療機器 / Single-vendor / IPA 8-12 weeks / Apps Guide 沈黙箇所 / 1.5T-3T extrapolation / SAR (Stress 時高) / 提供責任分界 — 詳細 explainer-common-limit.pages.dev。
結論
- qPerfusion = 5 段 cascade: Dual Sequence → Gd Map → MoCo → Deconv (Fermi/BTEX) → MBF/MPR。各 component が定量化精度に影響。
- 2 deconvolution model: Fermi (empirical, 商用 routine) vs BTEX (mechanistic, KCL Chiribiri 推進、research grade)。Peter Kellman (NIH) の fully-automated workflow が世界基準。
- 三重大 + 東北大 + NCVC routine。訪問前 30 秒 Decision Tree + Chiribiri/Kellman 双璧論文 5 添付。Common Limitation は Common Limit page 参照。